What Are Photo Negatives? A Guide to Film Negatives (Scanning, Storage & Restoration)
Film negatives reverse light and dark. Learn what types you have, whether to scan them, and how to store them.
Contents
- Film negatives are reversed images where light-sensitive silver halide crystals darken rather than bleach when exposed, requiring a second reversal during printing to produce a positive image.
- A 35mm negative scanned at 3000 DPI yields approximately 26 megapixels, while a 4×6 print scanned at 600 DPI yields 8.6 megapixels, making negatives the better source for archival files.
- Magnetic photo albums from the 1970s–1990s contain adhesive that degrades into acidic compounds, causing stains and deterioration over time; negatives should be removed immediately and stored in archival sleeves.
- Professional negative scanning typically costs more per image than print scanning due to specialized backlighting, alignment, and color correction requirements.
- Film negatives stored properly in dark, dry conditions at 65–70°F and 30–40% humidity will outlast most consumer-grade digital storage by decades.
Most negatives are found in unmarked envelopes, hidden away in the back of a closet or between the pages of old photo albums. At first glance they look wrong: A bright area in a negative looks dark, a dark area looks clear, and colors look strange. But your negatives are not damaged. What you see is what you would expect to see. A negative is meant to be a reversable light record which can be printed many times without any deterioration to the original image.
Forever Studios has scanned over 200,000 negatives at our South Florida studio and helps families preserve these original captures when prints are faded or lost. This guide explains what film negatives are, how to identify which type you have, whether they're worth scanning versus the prints you already own, and how to store or restore them without making irreversible mistakes.
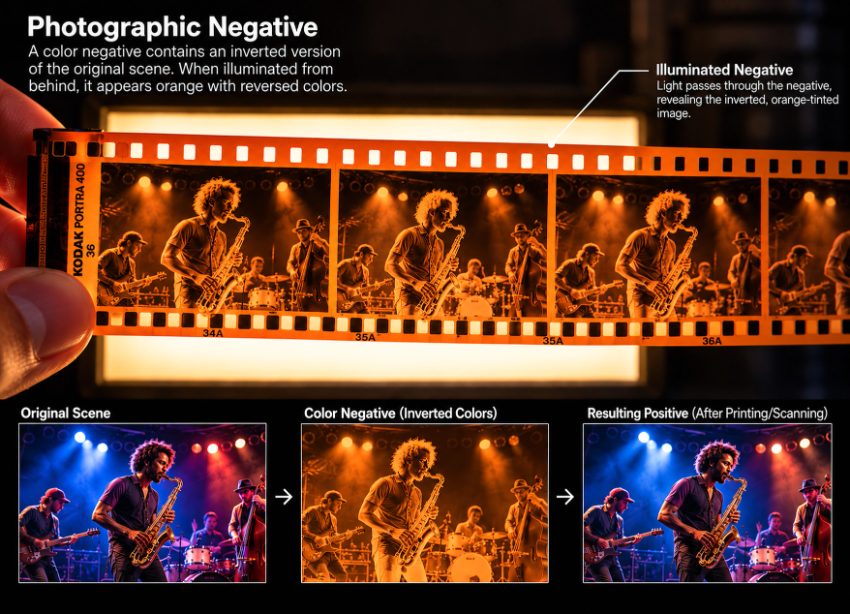
Film negatives preserve images in inverted colors and tones that reveal the original scene when properly developed or scanned.
What is a photo negative and why is the image reversed?
A film negative is made of a transparent strip of cellulose coated with light-sensitive silver halide crystals. Light from the scene in front of the camera passes through the lens of the camera to hit the film when the shutter button is pressed. More light means darker crystals and less light means clear crystals. A negative has a reverse image of what was seen, so very bright scenes will have dark areas on the negative and very dark scenes will have clear areas on the negative.
At the point of exposure, the chemicals in the camera film can darken in an instant as opposed to fading. This negative is then used as a template. When light is passed through the negative to expose photographic paper, another reversal takes place. Where the negative was clear, light will pass through to expose a dark area on the paper, and where the negative was dark, the light will be blocked and the paper will remain light. The end result is a positive image that looks exactly as the scene did when you took the photo.
In color negative film, the images also appear somewhat orange. That is due to an orange mask which tries to correct for non-ideal color dyes and gives the best results after printing. Black and white negatives on the other hand have no masking layer at all, which is why they look so much more normal than color negatives: reversed tones on clear film.
The reason for negatives to exist is durability. A print is a single use item which deteriorates with each handling, each exposure to light and each copy made. Negatives on the other hand are items which can be used to make dozens of prints without having to touch the original capture. That is why photographers were so particular in the storing of them and that is why you can find them after decades, when the prints have long since perished.
What are the different types of film negatives and how do I identify which I have?
Most people have film from 35mm, 110, 126 or 120 format. You can usually tell by the size of the camera and by looking at the sprocket holes along the edges of the film.
35mm film is the most common size of negative. This type of film is approximately 35mm wide, has sprocket holes on either side of the film strip, and each photograph is roughly 24mm x 36mm in size. 35mm negatives were produced by most compact cameras, many SLR cameras, and all one-hour photo labs from the 1960s until about 2002 or so. Negative strips were generally returned to customers in sleeves containing 4 or 6 photographs.
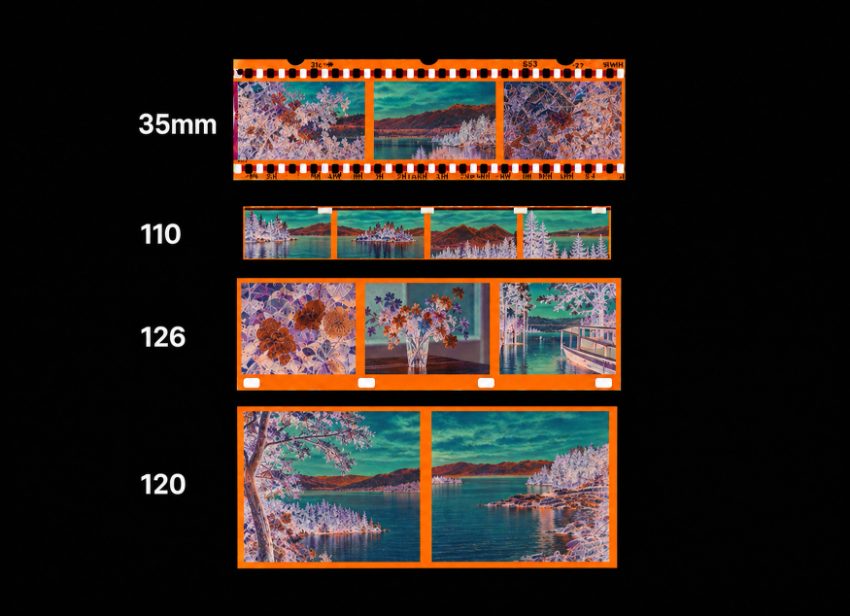
Each film format has distinct frame dimensions and sprocket hole patterns for identification purposes.
110 film is a much smaller format, about 13mm wide with one row of sprocket holes on one edge. It was designed to be used in small cartridges that were intended for use in pocket cameras of the 1970s and 1980s. The image quality is not as good as larger formats, but the cartridges were very convenient. Negatives that are thinner than a pinky finger are usually 110 format.
126 film / Instamatic film produces square pictures of about 28mm x 28mm with a single row of big square sprocket holes. The format was introduced by Kodak for simple cartridge-loading cameras in 1963. If the pictures are square and larger than 110 but smaller than 120 mm, then they are 126 film.
120 film (medium format) is about 60mm wide with no sprocket holes. The film itself is backed by opaque paper and wound on a spool. Frame sizes vary depending on the camera: 6×4.5cm, 6×6cm, 6×7cm, or 6×9cm. If your negatives are noticeably wider than 35mm and have no perforations, they're 120. These were used in higher-end cameras and produce substantially larger images.
These are less common film formats like 127 film (slightly narrower than 120 film, about 46mm), APS film with the magnetic data strips used in film from the 1990s and sheet film for use in view cameras with large individual negatives, typically 4×5 inches or larger. You can determine if you have one of these by measuring the width of the film and looking at the sprocket holes. With those two pieces of information you can tell if you have just about any format of film.

Forever Studios · Boca Raton, FL
Photo Scanning Service
High-resolution scanning for prints, albums, and loose photos.
LEARN MORE →Should I scan my negatives or the prints I already have?
Whether or not you can get your photos scanned as negatives depends on whether or not you have your organized, intact negatives paired with their corresponding prints. We see this all the time at Forever Studios, a photo scanning service based in South Florida. When families bring large boxes of photos to be scanned, expecting to have all of their childhood photos scanned as negatives for example, many of them end up finding that half of their negatives are missing, were never labeled, or were duplicates of prints that they already had.
Negatives generally hold more information than prints. For example, a 35mm negative typically contains 10-15 megapixels of genuine image information, with fine-grain film under ideal conditions potentially reaching 20-25 megapixels. In contrast, a 4×6 print scanned at 600 DPI produces only 8.6 megapixels of image information. A negative has the ability to capture more fine detail, a broader tone range, and more color information than a print. Thus, if you need to make very large reproductions, need to create very large and high-quality archival files, or need to restore very faded images, negatives are the better source. (Source: Film Scanning Resolution Guide: DPI, Megapixels & Quality Explained)
Scanning negatives requires more work. They need to be scanned with a backlight, aligned by hand, have any dirt or dust cleaned off, and then the colors corrected to reverse the effects of the orange mask that was used when the film was shot as color. Negatives can cost anywhere from $0.50 to $2.00 each to have professionally scanned. If you have 300 or so images to scan as prints, that would cost $150 – $210. Negatives, depending on the size and format of the negatives, can cost anywhere from $150 – $600 to have professionally scanned.
The practical test: Are your negatives labeled and stored in order? Can you match them to the prints you already have, or are they your only record of certain events? If the negatives are organized and you need high-resolution files, scan them. If they're a chaotic pile and you already have prints in acceptable condition, scan the prints first. You can always return to the negatives later for specific images that need restoration or enlargement.
After scanning over 200,000 negatives, we recommend scanning prints unless the negatives are intact, labeled, and stored separately from the prints. Most families have better luck starting with the prints they can actually see, then selectively scanning negatives for images that matter most.
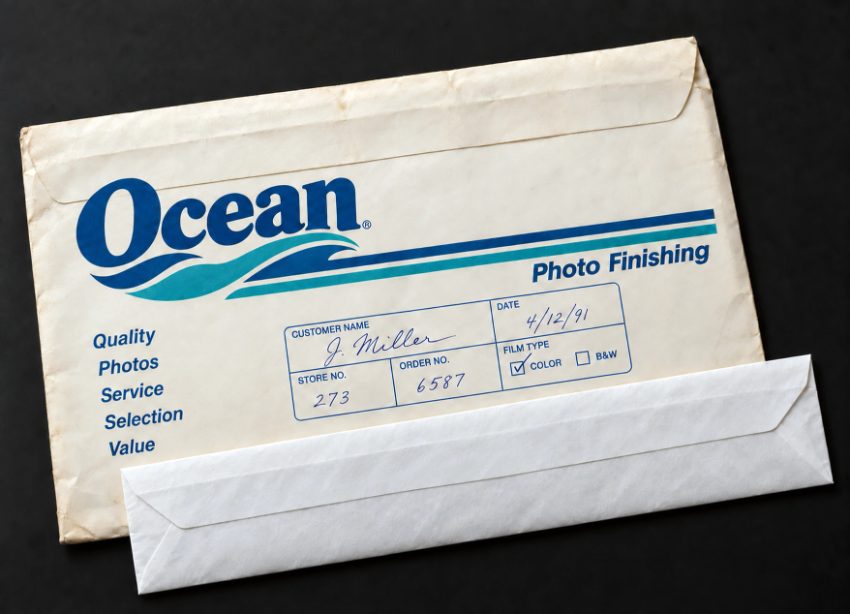
Photo finishing envelopes like these were once the standard way customers received their developed prints and negatives.
How should I store film negatives to prevent further damage?
When film negatives deteriorate, they generally go through three types of deterioration: chemical damage (from other storage materials), physical damage (from handling or pressure), and environmental damage (from heat, moisture or light). If these problems are caught early enough, they can be halted before the photograph deteriorates to the point where the emulsion pulls off the negative or undergoes permanent color change.
First rule: remove negatives from magnetic photo albums immediately. The adhesive in those albums, common from the 1970s through the 1990s, degrades into acidic compounds that stain and deteriorate both prints and negatives. The plastic overlay sheets yellow, stick to the film surface, and trap moisture. If you find negatives stored this way, carefully separate them now. Use a thin plastic card to gently lift stuck sections rather than pulling, which can tear the emulsion.
Store film negatives in archival sleeves made of polyethylene, polypropylene or polyester. PVC sleeves can contain acids and plasticizers which, over time, could damage your photographs. Most photography suppliers carry photo-safe or acid-free sleeves. Store one negative strip in each sleeve and then stand them up in an archival storage box. Storing negatives this way will prevent the upper negatives from being compressed by the weight of the negatives stacked on top of them.
Ideally you would store your negatives at a temperature of 65–70°F (18–21°C) and relative humidity of 30–40%. The cooler the better but do not allow the temperature to fluctuate drastically. For example, if you have your film in a cold basement and you move it to a warmer room, there is a danger of condensation forming which can promote mold. If you cannot store your negatives at exactly the right humidity then store them in a room that is climate controlled rather than in an attic, garage or damp basement.
Keep negatives away from light. Unlike prints, which are already developed and relatively stable, negatives can continue to react to UV exposure. Store them in opaque boxes or drawers, not in clear plastic bins on a shelf. Label the outside of the box with contents and dates so you don't need to open it repeatedly to find specific images.
NEGATIVES ARE HANDLED ONLY BY THE EDGES. Fingerprints on negatives contain oils that will attract dust for all time to come. When looking at negative contact prints, handle them while wearing cotton gloves. Rubber bands, paper clips and tape must never be allowed to touch film materials under any circumstances.
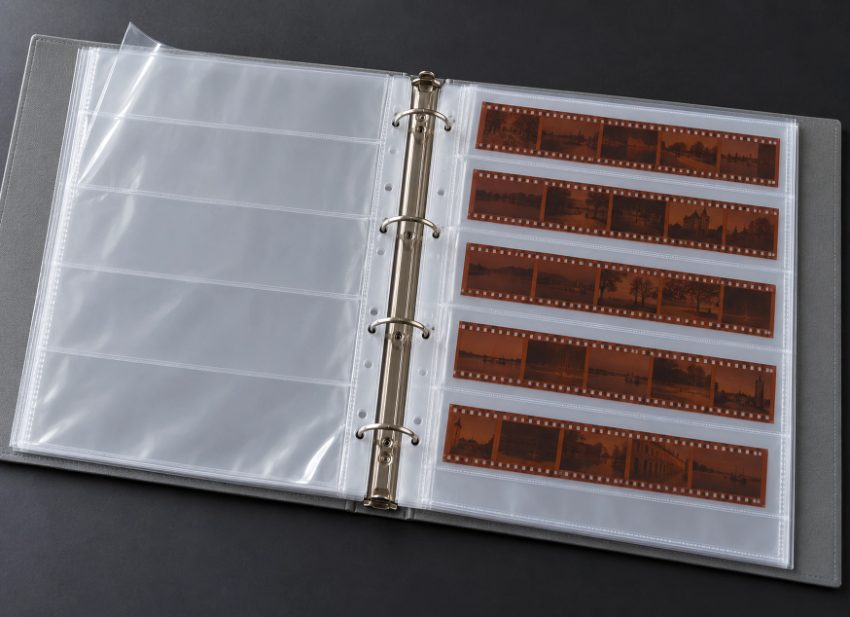
Archival binders with clear sleeves protect film negatives from dust, fingerprints, and environmental damage.
Can damaged or faded negatives be restored, and is it worth the cost?
Negatives can be restored even when the damage looks severe, but the economics depend on how irreplaceable the image is. Physical damage like scratches, tears, and mold can often be repaired digitally during the scanning process. Color shifts from improper storage can be corrected if the dyes haven't completely degraded. But if the emulsion has separated from the film base or the image has faded to near-invisibility, restoration becomes speculative reconstruction rather than recovery.
The typical restoration workflow starts with high-resolution scanning. At Forever Studios, we scan damaged negatives using SlideSnap machines for 35mm film at 3000–4000 DPI, which captures enough detail to work with even degraded areas. The scan is then passed to the restoration team, who use AI-assisted tools to identify and fill scratches, followed by artist reconstruction to correct color casts, rebuild missing sections, and balance exposure.
This professional restoration service costs $35 per image to restore, and $20 per image to colorize (if necessary) for a total of $55 per image. There is a $5 fee for a 1-business-day rush order. For simple automated fixing of dust and minor scratches on your images, the cost is a flat $5 per image. Is this service worth the money? For images of extraordinary value to you (e.g. the only photo of a grandparent, or a crucial family moment), yes. For images of little value to you (one of fifty similar photos from a vacation, for example), it would likely be more cost effective to scan the image without restoring it.
Negatives retain tonal information much better than prints as they age. Prints deteriorate as the dyes in the print material break down over time. The original negative, stored in the dark for example, will generally last much better than the corresponding print and when you compare a deteriorating print with the negative from which it was made, the negative will normally provide a much better starting point for restoration work.
There are some limitations to work with. If mold has eaten through the emulsion, that data is lost. Intense heat can melt the layers of a negative together, making it impossible to separate them. And, if the color dyes have shifted too far in any of the color channels, colorization will have to rely on typical skin tones and other environmental cues and will not be able to recover any information that was lost.
If a high-resolution scan of the negative reveals information that cannot be seen in the prints, then restoration of the negative is the recovery of information. On the other hand, if a scan of the negative shows nothing new that cannot be seen in the prints, then what you are paying for is interpretation, and that is only worth what you say the image is worth to you.
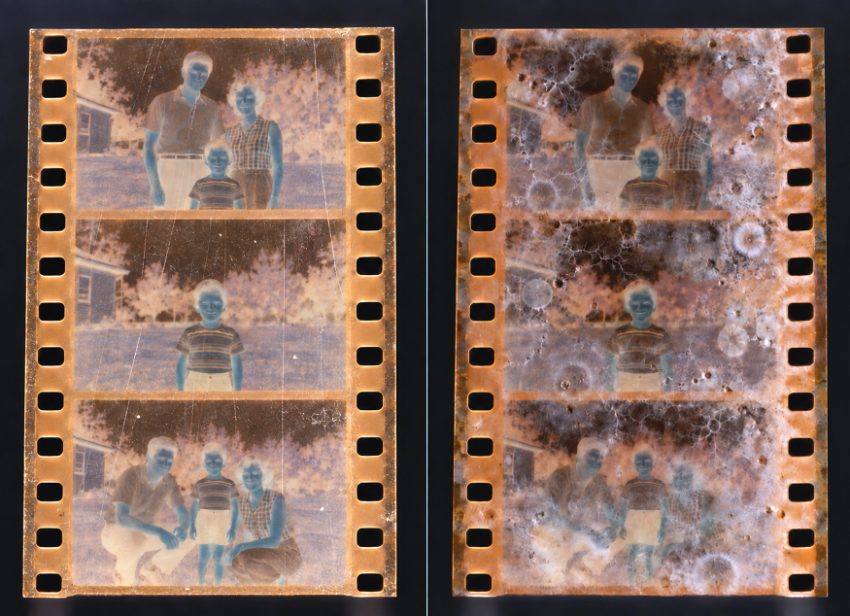
Film negatives can suffer from fading, discoloration, and physical damage over time, requiring professional restoration to preserve family memories.
Forever Studios · Boca Raton, FL
Photo Scanning Service
High-resolution scanning for prints, albums, and loose photos.
LEARN MORE →Should I keep my negatives after scanning them, or can I throw them away?
Keep them. Digital files degrade differently than physical negatives, and you can't predict which failure mode will occur first. Hard drives fail. Cloud services shut down. File formats become obsolete. But a film negative stored properly in a dark, dry box will outlast most consumer-grade digital storage by decades.
The argument for discarding negatives is space. Hundreds of negative strips in archival sleeves take up room, and if you've already scanned them at high resolution, it feels redundant. But consider the scenarios where you'd need the original: your house burns down and your backups were stored in the same location; a cloud service loses your account due to a billing error or company closure; you need to produce an enlarged print twenty years from now and scanning technology has improved enough that a rescan is worth it; or someone questions the authenticity of a digitized image and the negative is proof.
The negative can also serve as a verification step. Should you find any errors with the files you have scanned, such as mislabeled images, incorrect color correction, or cropped frames, you can always return to the negative and rescan. Many customers return to Forever Studios years after the initial scanning to create higher resolution copies of their images or to have them color corrected for improved viewing on the latest displays. The negative allows for this.
When space runs short and some of your negatives have to be destroyed, it is best to save those which have no prints left, those of personal or historical interest and those which are better than their prints. Start with duplicates and then with prints of good quality that do not add anything to your collection.
Store your negatives offsite. Rent a small safe-deposit box or store them with a relative in another state. This option will protect your photos from local disasters such as fires and floods and even theft. The cost of a safe-deposit box is about $20-60 per year which for most families is less than the emotional cost of losing irreplaceable photos in a digital crash.
How much does it cost to scan negatives professionally vs DIY, and what quality difference matters?
Can I scan negatives with my phone?+
Apps on your phone such as Photomyne or Google PhotoScan can be used to scan your prints with the aid of a backlight such as the screen of a tablet or the window. Results will be of acceptable quality for images to be posted online or printed at small sizes. However, the results are not as good as those provided by dedicated photo scanners when it comes to making archive quality copies of your images. Most importantly, each frame will need to be cropped and aligned individually – something that can become a major task when dealing with large numbers of images.
What's the difference between scanning negatives and scanning slides?+
What you see when viewing slides in their positive format is what will scan correctly. Although negatives are viewed in reverse format also, slides generally scan more quickly than negatives due to the lack of color correction required to remove the film’s inherent orange mask and to reverse color negative images. Backlight and similar scanning equipment are generally required for both slide and negative images.
Do I need to clean negatives before scanning them?+
Negatives can be cleaned before scanning with a soft brush or compressed air to remove loose dust. Some stubborn dirt spots can be removed with a microfiber cloth by applying gentle pressure. However, water, alcohol and most household cleaners must not come into contact with negatives as they can be severely damaged and compromise the emulsion layer. Negative cleaning is performed by professional services using specialist cleaning equipment, and using advanced infrared dust removal technology during the scanning process.
★★★★★
"These folks are true professionals, and strive to ensure excellence. They have restored many of my old family photos, some in really bad condition, which now look like they were taken today. Highly recommended!"
Rob, verified customer review
Digitizing Your Film Negatives: What Happens Next
Your family photos on film negatives are probably the most durable images your family has ever had. But being durable is not enough. We need to be able to use them. Scanning negatives converts durability into use. We can share them, print them and make backup copies of all our images without risking the original negatives. Whether you decide to do the scanning yourself or to have it done by a professional service depends on how many negatives you have, their condition, and your time and money.
At Forever Studios, we take care of every step of the process: cleaning, scanning with high resolution, color correction, and delivery of digital files with the original prints returned to you, safely wrapped in protective sleeves. Typical completion time for a digitization order is 2-3 weeks. The negatives are never taken out of our studio in Boca Raton. If they are too damaged or faded, we can also restore them digitally first before delivering the final output.
The negatives you found in that drawer aren't just reversed images. They're the original capture, the most information-dense version of those moments that still exists. Scanning them doesn't make the negatives obsolete. It makes them useful again.

Ready to digitize it right the first time?
Bring your tapes, film, and photos to the team that treats every project as irreplaceable. All work is handled in-house in Boca Raton, never outsourced.